Frequently Asked Questions About Tool Tracking with ShareMyToolbox
Welcome to the ShareMyToolbox FAQ page—your go-to resource for common questions about tool tracking, getting started, mobile use, and more. Whether you’re new to the platform or exploring ways to get more from your subscription, this page covers the key details. For in-depth how-to guides, visit our Support Portal.
Getting Started with ShareMyToolbox
Everything you need to know to hit the ground running with ShareMyToolbox’s tool tracking app.
ShareMyToolbox is a tool tracking app built for construction teams and field service pros. It lets you assign tools to workers, track check-ins and check-outs, and manage inventory across multiple locations—all from your phone or web dashboard. Learn more about how it works in our overview guide.
Our platform is used by contractors, electricians, HVAC techs, service teams, and tool managers who need a better way to track tools between the warehouse and jobsite. It’s built for any-sized company and scales as you grow. See industries >
Just visit our Free Trial page and sign up—no credit card required. You’ll get full access to all features for 14 days.
You’ll have the option to choose a paid plan and keep all your data. If you decide not to subscribe, your account will become inactive, but you can return later and pick up where you left off. Check out our pricing page for details.
You can add tools manually, import them in bulk, or use your phone to scan barcodes and QR codes. See how >
Nope! ShareMyToolbox runs in the cloud. You can access it through our mobile app (iOS or Android) or any web browser—no IT setup required.
Plans start with support for a set number of Connections (users), but you can always add more. Visit our pricing page to find the right fit for your team.
Yes! We offer a robust knowledge base, onboarding tips, and email support to help you and your team get up to speed quickly. Paid plans receive unlimited phone support as well.
Tool Tracking Features
Learn how ShareMyToolbox helps you keep tabs on every tool in your system—whether it’s in the warehouse, in a truck, or on a jobsite.
ShareMyToolbox uses a mobile-first check-in/check-out system. Workers can borrow tools, transfer them to others, and return them—all tracked in real-time. This eliminates guesswork and increases accountability. Admins can also easily assign tools via mobile device or on the web using the Web Portal.
Yes! Every tool record shows a complete history, including who has it, where it went, and when it’s due back. You’ll always know who’s responsible for what.
Absolutely. You can attach photos, model numbers, categories, serial numbers, and more to each tool. This helps prevent confusion and simplifies identification in the field.
Yes—you can assign tools to individual users (like foremen or techs) or to specific projects or jobsites. It’s easy to track by job, person, or location.
Yes! Use your phone to scan barcodes or QR codes and instantly view or update tool records. This is great for speeding up checkouts and inventories. Learn how to use QR codes →
There is! Tools can be transferred directly from one person to another in the app, maintaining a clean chain of custody and improving traceability.
Yes. You can filter and sort your tool list by jobsite, person, or location so you always know what’s where—and what’s missing.
ShareMyToolbox sends alerts when tools are due to be returned, helping reduce loss and keeping your team accountable. These alerts show up in the app and dashboard.
Mobile App & Field Use
Built for the field. Here’s how ShareMyToolbox helps crews on the go stay connected and accountable.
Yes! Our mobile app is available for both iOS and Android. It’s designed for field workers to easily check tools in/out, scan barcodes, and transfer tools—all without needing a computer. Download the app →
Field users can (depending on permissions that you set):
View available tools
Check tools in and out
Transfer tools to others
Scan QR/barcodes
Add tool photos
Leave notes or condition updates
It’s fast, intuitive, and doesn’t require any special training.
Yes, the app requires an internet connection, and syncs automatically in real-time.
Field workers can see what the company has in the inventory. You can set certain permissions for employees to control actions an employee can take.
Yes. ShareMyToolbox was built to manage tools across multiple jobsites and crews. Each worker can update tool status in real-time, no matter where they’re located.
Definitely. Workers can snap photos of damaged tools, leave notes about condition or missing parts, and even flag tools for repair—all from the field.
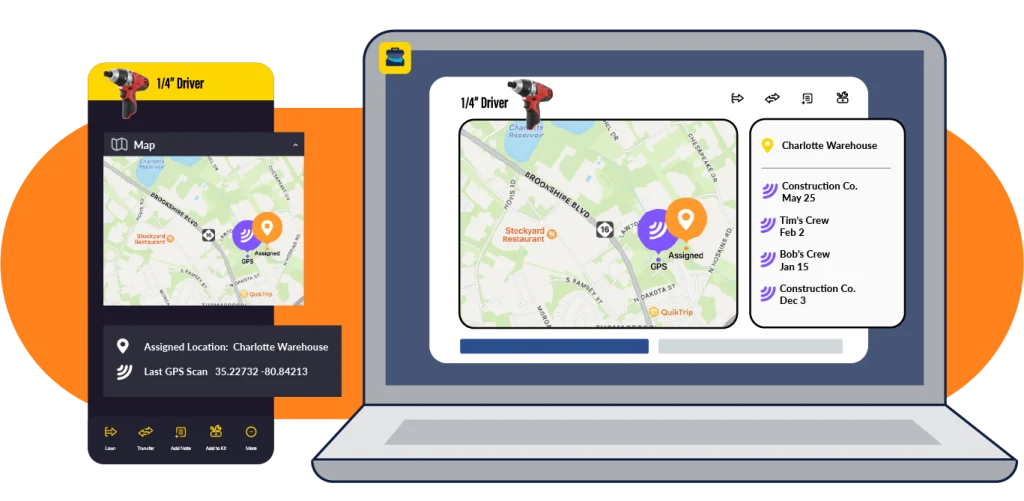
You’ll always know who last had it. With a full history log and due alerts, you can quickly investigate missing tools and reduce loss. In addition, paid users have access to GPS location coordinates when an Item is scanned.
While there isn’t a reservation system yet, many companies use Virtual assignments to pre-stage tools for upcoming jobs.
Inventory & Maintenance
Keep tools in working order and know exactly what you have on hand—without spreadsheets or guesswork.
Yes. You can track both serialized tools (like drills and saws) and non-serialized items (like cords, blades, or fasteners). It’s an easy way to manage all the gear your team needs to get the job done.
Absolutely. ShareMyToolbox supports tracking quantities of consumable items, making it easy to restock parts like drill bits, tape rolls, and safety gear.
Yes—each tool record includes a condition field and notes. Workers can flag damaged tools, upload photos, or leave comments about maintenance needs.
Yes! Use Notes, photos, Audits, tool condition tagging, and tool history features to track maintenance and inspection status. See how teams track tool health →
Absolutely. Set reminders to be notified when it’s time for maintenance or calibration.
You have the option to set due dates for each loaned Item, and Admins can easily keep tabs on the status with dashboards and alerts. You’ll always know what hasn’t been returned—and by whom.
Yes. Currently all inventory is visible to all employees, but you can control who is able to access certain actions
Yes! The web dashboard allows you to export reports on many things including complex filtering on Items, Audits, and Costing. It’s a fast way to stay in control.
Billing & Subscription
Everything you need to know about plans, pricing, and what happens after your trial ends.
Plans start at just $100/month and scale based on the number of users you need. We keep pricing simple, transparent, and tailored to growing teams. View full pricing →
You get full access to all features—tool tracking, mobile check-in/out, user permissions, reporting, and more. No credit card required. Start your trial →
You’ll have the option to subscribe and keep using the platform without losing any data. If you don’t upgrade, the account becomes inactive, but your info stays safe for a short time in case you return later.
Nope! ShareMyToolbox is a month-to-month subscription. Cancel anytime with no penalty.
Yes. You can upgrade or downgrade your plan as your needs change.
Nope. Unlike many systems, ShareMyToolbox allows you to track and inventory unlimited tools and items.
Billing management is handled through the Web Portal.
Yes! We offer a discount for annual subscriptions and may have options for nonprofits. Contact us for details.
Security & Permissions
You control who sees what. Here’s how ShareMyToolbox keeps your data secure and your teams organized.
Yes. ShareMyToolbox uses secure cloud hosting. View our Privacy Policy to learn more.
To make sharing easy, all Employees can see all tools and items in the company’s inventory.
ShareMyToolbox includes flexible permission settings for Connections:
Admins:
An Admin Connection Role functions as The Company. It can:
-Loan
-Transfer
-Return
-Add/Edit/Delete Items & Connections
-Accept Borrow/Return requests
-Create Notes
-Delete system wide Notifications
In addition, the Primary Admin can manage the Subscription.
Employee Users: An Employee Connection Role can:
-Borrow, Return, and Transfer Items*
-Create Notes
-Add Tools**
*Acceptance is required unless “Auto-Accept” is enabled
**If enabled in User Settings
Virtual
A Virtual Connection Role is a placeholder in ShareMyToolbox to track Items.
Virtual Connections are not users and do not have a sign-in.
Examples of Virtual Connections:
-Lost/Stolen Tools
-Under Repair
-Deleted Tools
-Subcontractors
-Employees with no smartphone
-Employees not using ShareMyToolbox
-An Admin that needs to also Borrow Items
-A Location or Job if your company isn’t using the Location Tracking option
You can assign roles that fit your team’s structure. Learn more >
Yes. You can update, deactivate, or reassign roles anytime from the admin dashboard.
Yes! Every tool has a complete history—who had it and when it moved. It’s a powerful way to increase accountability and reduce loss.
Troubleshooting & Support
Need help? Here’s how to get quick answers, resolve issues, and make the most of ShareMyToolbox.
Our Support Portal is the best place to start. It’s packed with how-to articles, setup guides, and troubleshooting tips. You can also submit a request if you need more help.
You can reach us directly through the Support Portal, or contact us here. We typically respond within one business day.
For our paid plans, we offer email and phone support.
On the login screen, tap “Forgot Password?” and follow the prompts. You’ll get an email with instructions to reset your password. Admins can also reset passwords for Connections.
Yes. We offer onboarding support through our knowledge base in addition to email and phone guidance. We’re happy to recommend rollout strategies.
We post product news online.
Absolutely—we’d love to hear your ideas! Submit feedback here.
Still have questions? The best way to see if ShareMyToolbox fits your team is to try it free for 14 days.